
目次 非表示
一言で表すと
Activityと同様にアプリの画面を構成します
詳細を説明すると
以前Activityの記事を書きましたが、今回紹介するFragmentもActivityと同様にアプリの画面を構成します。
Activityと同じ画面なのに何が違うのか、気になった方もいると思います。
そこで、Activityとの違いについて見ていきましょう。
以下の二点で違いがあります。
- Activityよりも必要なメモリが少ない
- 他のActivity上で再利用できる
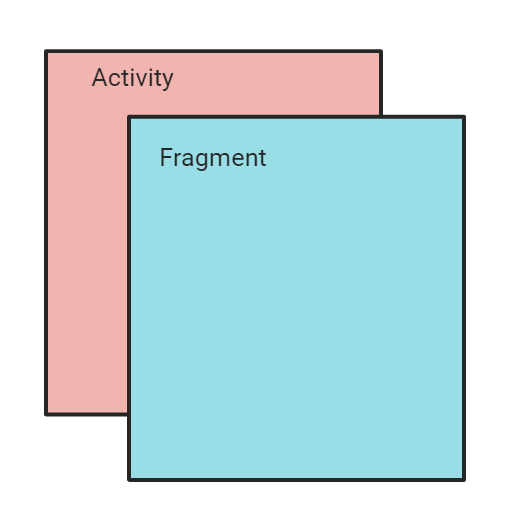
Fragmentはそれ単体で使う事はできず、Activityの上に表示させることで画面としての役割を持たせられます。
下記図のように、Activity上にFragmentが積まれているイメージが分かれば大丈夫です。
ミニマム実装してみよう
今回は、Activityの上にFragmentを表示させ、さらにその上にFragmentを表示させるという実装をしていきます。
また、画面構成は以下のような図になります。

では、早速実装をしていきます。
最初に使用する文字と色を用意していきます。
(以下の4つを追加)
<string name="first_fragment_text">This is FirstFragment</string>
<string name="second_fragment_text">This is SecondFragment</string>
<string name="third_fragment_text">This is ThirdFragment</string>
<string name="show_fragment_button_title">next fragment</string>
(以下の4つを追加)
<color name="activity_red">#ef534e</color>
<color name="first_fragment_blue">#64b5f6</color>
<color name="second_fragment_green">#64dd17</color>
<color name="third_fragment_yellow">#ffee58</color>
また、今回はアニメーションを付けて視覚的に理解しやすいようにします。
下記アニメーションファイルを作成しましょう。
今回は、アニメーションの学習ではないので理解できなくても大丈夫です。

下から上に移動するアニメーションです。
<?xml version="1.0" encoding="utf-8"?>
<set xmlns:android="http://schemas.android.com/apk/res/android"
    android:shareInterpolator="false">
    <translate
        android:fromXDelta="0%"
        android:toXDelta="0%"
        android:fromYDelta="100%"
        android:toYDelta="0%"
        android:duration="300" />
</set>
では、MainActivityファイルのレイアウトを以下の様に変更します。
「FragmentContaienrView」とは、Fragmentを載せるための器のようなものです。
これを配置することで、Fragmentを上に表示させることが出来ます。
<?xml version="1.0" encoding="utf-8"?>
<layout xmlns:android="http://schemas.android.com/apk/res/android"
    xmlns:app="http://schemas.android.com/apk/res-auto">

    <androidx.constraintlayout.widget.ConstraintLayout
        android:layout_width="match_parent"
        android:layout_height="match_parent">

        <androidx.fragment.app.FragmentContainerView
            android:id="@+id/fragment_container_view"
            android:layout_width="0dp"
            android:layout_height="0dp"
            app:layout_constraintBottom_toBottomOf="parent"
            app:layout_constraintEnd_toEndOf="parent"
            app:layout_constraintStart_toStartOf="parent"
            app:layout_constraintTop_toTopOf="parent" />

    </androidx.constraintlayout.widget.ConstraintLayout>
</layout>
では、具体的にどのようにしてFragmentをActivity上に追加するのでしょうか?
それは、FragmentManagerがトランザクション処理を実行することによって実現しています
FragmentManagerとは、FragmentをActivity上に追加したり削除したり、別のフラグメントと交換する役割があります。
トランザクション処理とは、最初から最後まで決まっている処理のことを指します。
今回の場合だとFragmentをActivity上に追加する処理を定義して、それをFragmentMangerに実行してもらいます。
class MainActivity : AppCompatActivity() {
    private lateinit var binding: ActivityMainBinding
    override fun onCreate(savedInstanceState: Bundle?) {
        super.onCreate(savedInstanceState)
        binding = ActivityMainBinding.inflate(layoutInflater)
        val view = binding.root
        setContentView(view)

        val transaction = supportFragmentManager.beginTransaction()
            .setCustomAnimations(
                R.anim.enter_anim,
                R.anim.exit_anim,
                R.anim.enter_anim,
                R.anim.exit_anim
            )
            .add(R.id.fragment_container_view, FirstFragment())
            .addToBackStack(null)
        transaction.commit()
    }
}
transactionが実行するトランザクション処理を持っています。
最後にcommitメソッドを実行してFragmentを表示させる処理が走ります。
supportFragmentManager : FragmentManagerにアクセスできるメソッド
beginTransaction : トランザクション処理の開始するメソッド
add : 第二引数に渡したFragmentを追加する
addToBackStack : トランザクション処理を記録する
commit : トランザクション処理の実行
では、本題のFragmentの実装を見ていきます。
まずは、レイアウトとFragmentを継承させたクラスを3つ作ります。
<?xml version="1.0" encoding="utf-8"?>
<layout xmlns:android="http://schemas.android.com/apk/res/android"
    xmlns:app="http://schemas.android.com/apk/res-auto">

    <androidx.constraintlayout.widget.ConstraintLayout
        android:layout_width="match_parent"
        android:layout_height="match_parent"
        android:background="@color/purple_200">

        <TextView
            android:id="@+id/text_view"
            android:layout_width="wrap_content"
            android:layout_height="wrap_content"
            android:text="@string/first_fragment_text"
            android:textColor="@color/white"
            android:textSize="16sp"
            app:layout_constraintBottom_toBottomOf="parent"
            app:layout_constraintEnd_toEndOf="parent"
            app:layout_constraintStart_toStartOf="parent"
            app:layout_constraintTop_toTopOf="parent" />

        <Button
            android:id="@+id/button_view"
            android:layout_width="wrap_content"
            android:layout_height="wrap_content"
            android:layout_marginTop="32dp"
            android:backgroundTint="@color/white"
            android:text="@string/show_fragment_button_title"
            android:textColor="@color/purple_200"
            app:layout_constraintEnd_toEndOf="parent"
            app:layout_constraintStart_toStartOf="parent"
            app:layout_constraintTop_toBottomOf="@id/text_view" />

    </androidx.constraintlayout.widget.ConstraintLayout>
</layout>
class FirstFragment : Fragment(R.layout.fragment_first) {
private lateinit var binding: FragmentFirstBinding
override fun onViewCreated(view: View, savedInstanceState: Bundle?) {
super.onViewCreated(view, savedInstanceState)
binding = DataBindingUtil.bind(view)!!
binding.buttonView.setOnClickListener {
parentFragmentManager.beginTransaction()
.setCustomAnimations(
R.anim.enter_anim,
R.anim.exit_anim,
R.anim.enter_anim,
R.anim.exit_anim
)
.add(R.id.fragment_container_view, SecondFragment())
.addToBackStack(null)
.commit()
}
}FragmentのコンストラクタにレイアウトのIDをセットすると作成したレイアウトが画面に表示できるようになります。
FragmentからFragmentManagerにアクセスするには、parentFragmentManagerを使用します。
<?xml version="1.0" encoding="utf-8"?>
<layout xmlns:android="http://schemas.android.com/apk/res/android"
    xmlns:app="http://schemas.android.com/apk/res-auto">

    <androidx.constraintlayout.widget.ConstraintLayout
        android:layout_width="match_parent"
        android:layout_height="match_parent"
        android:background="@color/purple_700">

        <TextView
            android:id="@+id/text_view"
            android:layout_width="wrap_content"
            android:layout_height="wrap_content"
            android:text="@string/second_fragment_text"
            android:textColor="@color/white"
            android:textSize="16sp"
            app:layout_constraintBottom_toBottomOf="parent"
            app:layout_constraintEnd_toEndOf="parent"
            app:layout_constraintStart_toStartOf="parent"
            app:layout_constraintTop_toTopOf="parent" />

        <Button
            android:id="@+id/button_view"
            android:layout_width="wrap_content"
            android:layout_height="wrap_content"
            android:layout_marginTop="32dp"
            android:backgroundTint="@color/white"
            android:text="@string/show_fragment_button_title"
            android:textColor="@color/purple_700"
            app:layout_constraintEnd_toEndOf="parent"
            app:layout_constraintStart_toStartOf="parent"
            app:layout_constraintTop_toBottomOf="@id/text_view" />

    </androidx.constraintlayout.widget.ConstraintLayout>
</layout>
class SecondFragment : Fragment(R.layout.fragment_second) {
private lateinit var binding: FragmentSecondBinding
override fun onViewCreated(view: View, savedInstanceState: Bundle?) {
super.onViewCreated(view, savedInstanceState)
binding = DataBindingUtil.bind(view)!!
binding.buttonView.setOnClickListener {
parentFragmentManager.beginTransaction()
.setCustomAnimations(
R.anim.enter_anim,
R.anim.exit_anim,
R.anim.enter_anim,
R.anim.exit_anim
)
.add(R.id.fragment_container_view, ThirdFragment())
.addToBackStack(null)
.commit()
}
}
}<?xml version="1.0" encoding="utf-8"?>
<layout xmlns:android="http://schemas.android.com/apk/res/android"
xmlns:app="http://schemas.android.com/apk/res-auto">
<androidx.constraintlayout.widget.ConstraintLayout
android:layout_width="match_parent"
android:layout_height="match_parent"
android:background="@color/third_fragment_yellow">
<TextView
android:id="@+id/text_view"
android:layout_width="wrap_content"
android:layout_height="wrap_content"
android:text="@string/third_fragment_text"
android:textColor="@color/white"
android:textSize="16sp"
app:layout_constraintBottom_toBottomOf="parent"
app:layout_constraintEnd_toEndOf="parent"
app:layout_constraintStart_toStartOf="parent"
app:layout_constraintTop_toTopOf="parent" />
</androidx.constraintlayout.widget.ConstraintLayout>
</layout>class ThirdFragment : Fragment(R.layout.fragment_third)

すいみー
特技 早起きをすること